On this page
- Station 1. Pattern
- Station 2. Toile and muslin fitting
- Station 3. Fabric cutting and numbering
- Station 4. Gathering, piping and stay tape
- Station 5. Bodice structure: bust support, boning and padding
- Station 6. Concealed zip and placket
- Station 7. Hand embellishment
- Station 8. Steam pressing and hanging
- Station 9. Final inspection
- How the time splits, station by station
- The timeline you plan against
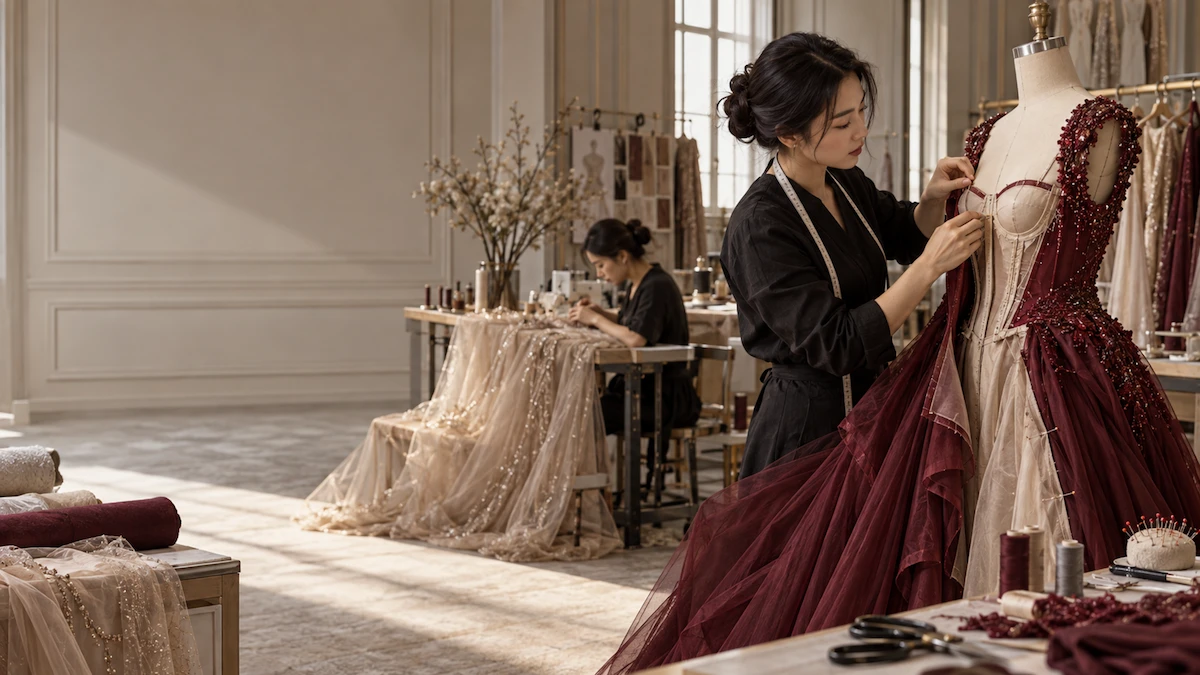
A finished evening gown leaves our building having passed through roughly 250 individual handlings across nine stations (TBC, counted from our internal process map for a beaded style). That number sounds large until you walk the route. A pattern is drafted by one person. A toile is fitted by another. The fabric is cut and numbered by a third. Then the garment moves through sewing, structuring, closure, embellishment, pressing and inspection. None of those steps is done by a single pair of hands. On a structured, beaded gown the embellishment station alone accounts for several hours of one operator's day, and the garment sits in front of that person the whole time.
We write this as a walk. We take you through the workshop the way we take a buyer on a factory visit, station by station, in the first person, because the only honest way to describe manufacturing is to describe what actually happens on the bench. Each station below carries two things most factory pages leave out. A mistake that gets made there, and the cost of that mistake that you will not see on the invoice. The invoice shows the fabric and the labour. It does not show the two days lost to a misgraded pattern, or the rework buried inside the price of a gown that was quietly fixed before you ever saw it.
If you are sourcing eveningwear, the categories this process feeds are our evening gowns, our occasionwear and our broader dresses range. We keep 260 ready-stock styles with real RMB prices on file, available through our ready-stock hub, for buyers who need product without a development cycle. The rest of this article is about the made-to-order route, and what your money actually pays for when a gown is built from nothing.
Station 1. Pattern
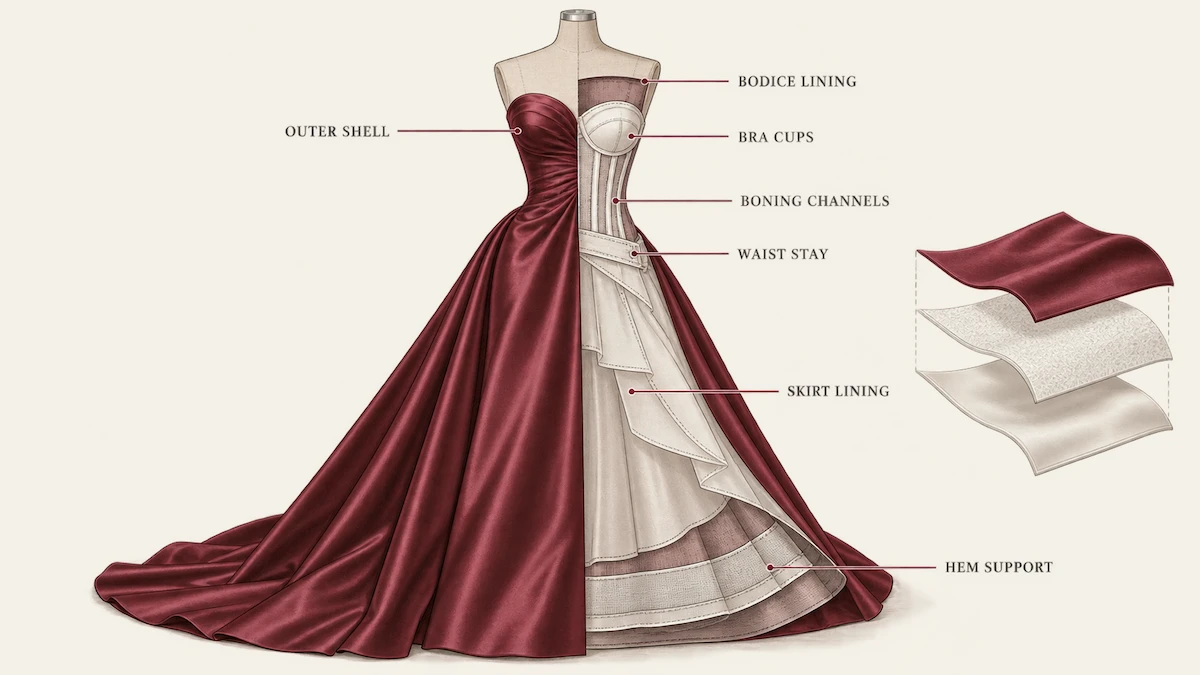
Everything starts on paper, or on a screen that behaves like paper. We draft the pattern from your tech pack or your reference garment. A pattern is not a drawing. It is a set of flat pieces, each one a precise shape, that when sewn together produce the three-dimensional body you sketched. For an evening gown this means the bodice front and back, the side panels if the design has them, the waist stay, the skirt panels, the lining, and any facing or placket pieces. We grade it across your size range, which means we generate the small, medium and large versions from the base size without distorting the proportions.
The marker comes next. A marker is the layout of every pattern piece, nested together, drawn onto the length of fabric that will be cut. The marker decides how much fabric the gown eats. A good marker on a 145cm width fabric can save a metre per gown over a careless one, and on a run of four hundred pieces that metre is the difference between a profitable order and a thin one. We plot markers by hand-assisted software and we check them before fabric is laid.
The mistake made here is a misgraded waist seam. If the bodice grades half a centimetre wider at the side seam than the skirt at the same size, the two pieces will not meet cleanly, and the operator at the sewing machine absorbs the error by easing the fabric, which shows as a pucker you cannot see until the garment is worn.
Its invisible cost is the time. A misgraded pattern is not caught at the pattern table. It is caught at the toile stage, or worse, at bulk, and every correction after the fabric is cut carries the cost of reprinted paper, a new marker, and the delay. We build the pattern once and check the grade rules before a centimetre of cloth is touched.
Station 2. Toile and muslin fitting
Before any fashion fabric is cut we build a toile. A toile is the garment made in cheap, plain cloth, usually muslin, to prove the pattern in three dimensions. Patterns are flat. Bodies are not. The toile is where a flat pattern meets a curved human and the gaps show. We sew the toile on the same machine settings and the same seam allowances the real garment will use, then we fit it to a form or a fit model and we read what the cloth tells us.
Draping lives in this station too. For a gown with a bias skirt or a cowl, we often skip a precise flat pattern for the skirt and drape it directly on the form, pinning and shaping the muslin until the fall is right, then tracing that shaped cloth back into a pattern piece. Draping is slower than flat cutting but it is the only way some silhouettes ever sit correctly, and a gown that is supposed to move with the body cannot be faked with a flat block.
We check the toile for balance. A gown that hangs crooked on the form will hang crooked on the customer, and a centre front that drifts to the left by a centimetre is a flaw no one can name but everyone can see. We also check the skirt sweep, the hem length against your requested measurement, and whether the neckline sits where the sketch promised. On a strapless style we check the stay and the grip, because a strapless bodice that drops is the most expensive return in eveningwear.
The mistake made here is fitting the toile to a form that does not match your size standard. We grade for UK, US and EU blocks and they are not the same. A toile fitted to a UK 12 form, then bulk-run for a US 8 customer base, ships garments that are quietly two sizes off at the bust. The toile looked perfect. The customer felt the difference.
Its invisible cost is a second toile. Every repeat of the fitting round adds days to your sampling window and a fee to your development, and most buyers blame the factory for slow sampling when the delay was a form mismatch decided at the brief. We confirm the grading block before we cut the first toile, and we tell you which block your market needs.
Station 3. Fabric cutting and numbering
Once the toile is approved we lay the real fabric. Cutting is done with a straight knife on a lay, or with a single-ply cutter for delicate or beaded-base cloth. The marker from station one is printed and pinned to the top of the lay, and the cutter follows it. For an evening gown the lay is usually short. These are not thousand-piece runs. They are often a few hundred, and the cutting has to be accurate because there is little spare cloth to fix a mistake.
Numbering is the quiet discipline of this station. Every cut piece, left and right, gets a bundle number and a sequence. When the skirt front is cut we mark it as bundle 14, piece 3, so that when it reaches the sewing line it can be matched back to its siblings. On a solid colour this feels like overhead. On a fabric with a directional print or a pile, or on a fabric where the dye lot varies piece to piece, numbering is the only thing that stops a garment from being built from two fronts that do not quite match.
We also cut the interfacing and the rigilene channels at this stage if the structure is fusible rather than sewn, and we bundle the cut work with its trims so that a sewing operator receives a complete kit, not a pile of loose pieces hunting for a zip. A missing zip is found at the closure station, which is the worst place to find it, because the garment is otherwise finished and now it waits.
The mistake made here is a skewed lay. If the fabric is stretched as it is laid, the bottom of the lay is longer than the top, and the pieces cut from the two ends differ by millimetres that compound at the seam. The operator sews what they have and the gown twists.
Its invisible cost is fabric. A skewed or poorly nested lay wastes cloth, and on a gown that consumes two metres of a costly woven, a few centimetres of waste per gown across a run is real money baked into the price before you see the quote. We lay on tensioned tables and we check the lie of the cloth before the first cut.
Station 4. Gathering, piping and stay tape
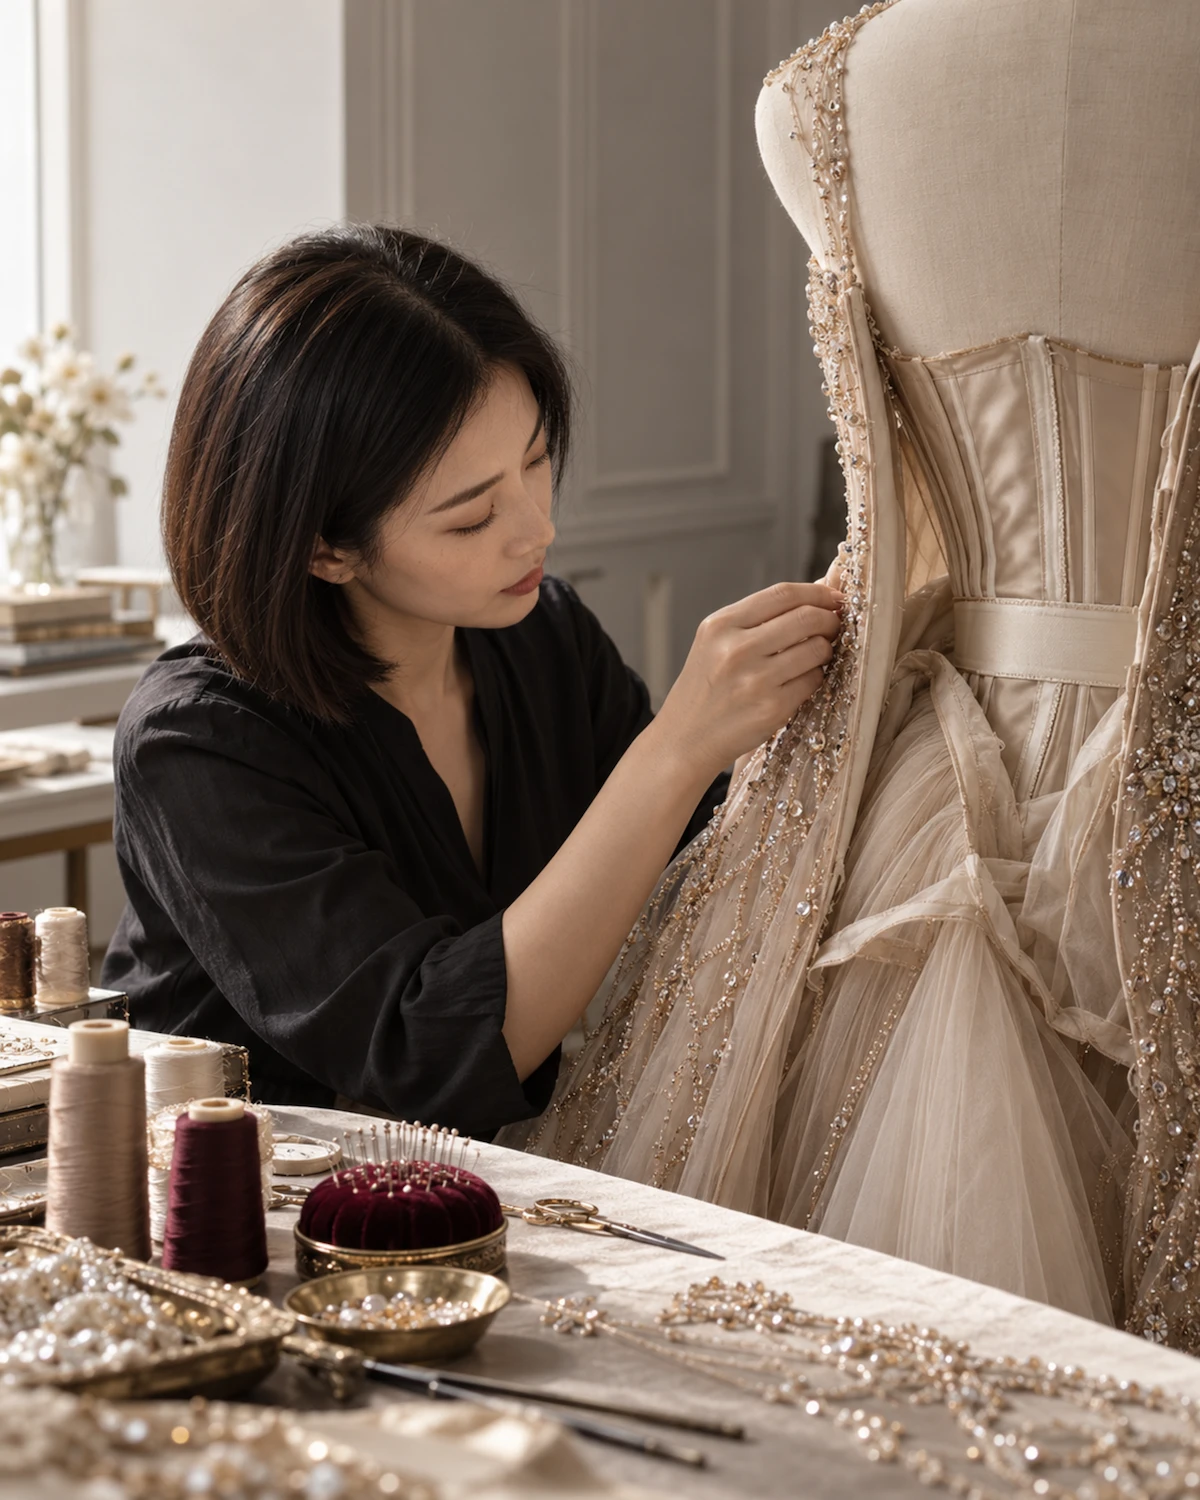
This is the station where flat pieces start to become a garment. Gathering pulls a longer edge into a shorter one, the way a skirt waist is gathered to a bodice, or the way a ruffle is built. We gather on a regulated machine with two rows of stitching so the ease is even and does not bunch at the centre. Piping is the corded edge sewn into a seam to give it definition, and it is fiddly because the cord has to run uninterrupted around corners. Stay tape is the narrow tape sewn to an edge that will not stretch, like a neckline or an armhole, so the garment holds its shape instead of sagging after an hour of wear.
On an evening gown these three operations are where the difference between homemade and factory shows. A gathered skirt that is uneven reads as a mistake from across a room. A piped seam that breaks at the corner reads as cheap. A neckline without stay tape droops, and no amount of pressing fixes a droop that is built into the stitch.
We also set the waist stay at this station for gowns that carry it. The waist stay is the inner ribbon that takes the weight of a heavy skirt so the zipper does not bear the load, and if it is sewn crooked the whole gown sits half a centimetre low at the back. We anchor it by hand at the side seams so it cannot migrate in wear or in the wash.
The mistake made here is over-gathering the bodice waist. If the ease is pulled too tight the skirt pulls up at the centre front and the hem rises unevenly, and the person who finds it is the customer at the event, not anyone in the building.
Its invisible cost is rework at the worst moment. A gown gathered wrong is a gown that is already lined and structured when the error is spotted, because gathering happens after the structure in some build orders and before it in others. Either way the fix means unpicking a finished section, and unpicking costs more than sewing because it is slower and it risks the cloth. We set the gather ratio on a sample length first, measure the finished width, and only then run the production pieces.
Station 5. Bodice structure: bust support, boning and padding
The bodice is where an evening gown earns its price. A T-shirt hangs from the shoulders. An evening gown bodice has to stand up on its own, hold a bust, and keep its line through a full evening of movement. We build it in layers. The outer shell, the lining, and between them the structure.
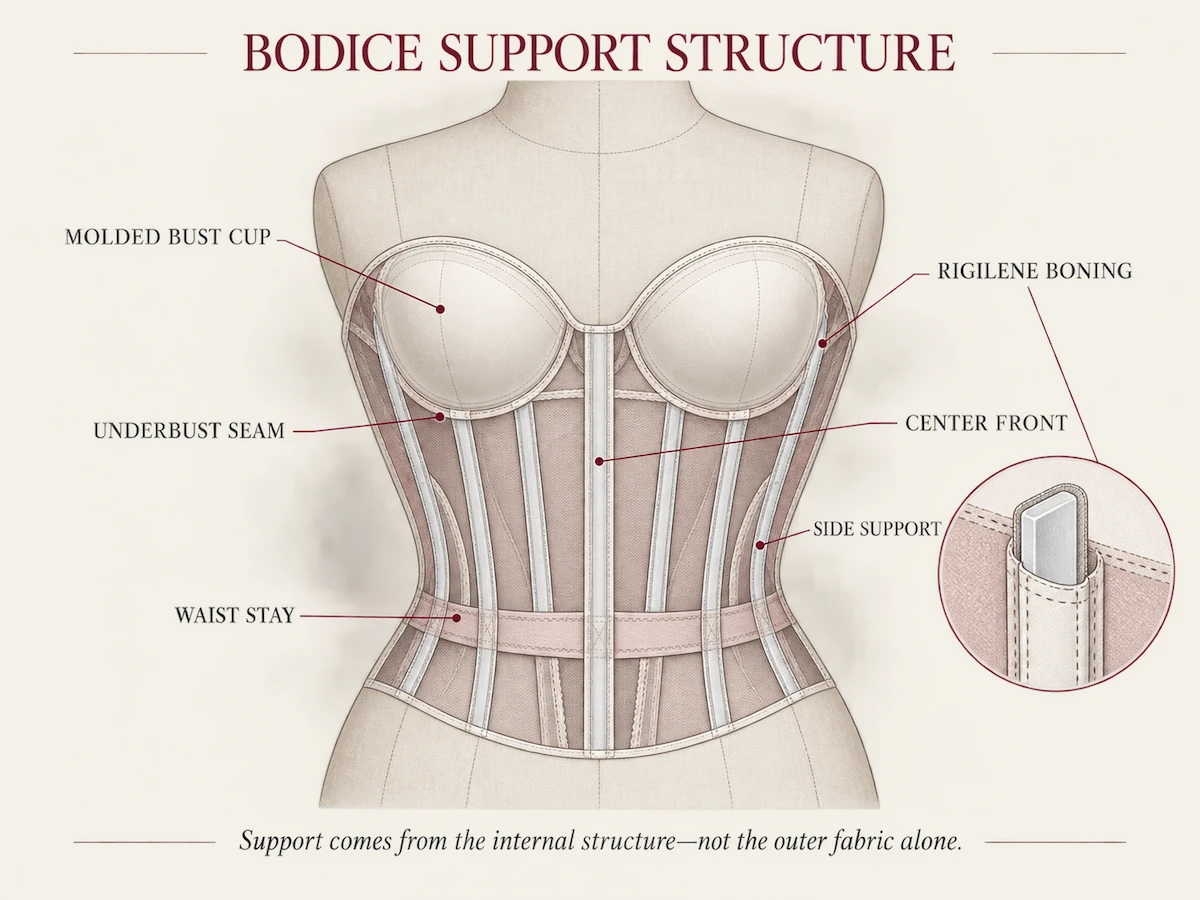
Bust support starts with cups. For a strapless or low-back style we sew in foam or fibre cups at the correct height and angle, then we stabilise them so they do not rotate. Padding at the bust and the hip is what gives a gown its advertised shape, and we place it against the lining rather than the shell so the outside cloth stays smooth. Boning is the rigid element that holds the vertical line of the bodice. We use rigilene, a flexible nylon-coated boning that bends with the body but springs back, set into casings sewn at the side seams and the centre back. Steel boning is used where more hold is needed, usually on a corset-style gown, and it is heavier and harder to ship.
We also set the under-bust wire or the internal corset busk where the design calls for it, and we hand-overcast every raw edge of the structure so that nothing scratches the wearer and nothing ravels in storage. A gown spends more of its life on a hanger than on a body, and the structure has to survive both. We press the bodice on a tailor's ham so the curves are shaped into the cloth rather than flattened out of it.
The mistake made here is boning placed against the shell instead of inside a casing. When rigilene sits directly under the fashion fabric it prints a line through the cloth, and on a satin gown that line is visible in photography and under event lighting. We always case the boning. A gown with uncased boning is the fastest way to look like a costume.
Its invisible cost is returns. A bodice that does not hold, that gaps at the side or drops at the front, is the single most common reason an evening gown comes back, and returns on occasionwear are brutal because the event already happened. The structure is also the most labour-dense part of the garment after embellishment, so a bodice rebuilt once in production is a bodice paid for twice. We fit the structure at the toile stage on a form that matches your size block, and we photograph the build so the approval is on record before bulk begins.
For buyers comparing constructions, the piece that explains where the money goes in a structured gown is our costed breakdown of Three Dresses, Costed: What a Factory Actually Charges For, and the piece that explains how a shaped panel is engineered is our note on Pleats and Draping: How They're Engineered.
Station 6. Concealed zip and placket
The closure is the most judged seam on the gown. A concealed zip, sometimes called an invisible zip, sits in the centre back and disappears into the seam so the line of the gown is unbroken. We sew it with a dedicated invisible zip foot, then we press the seam open from the back so the teeth do not shadow through the fabric. A placket is the fabric facing behind the zip that hides the guts of the closure and gives the seam something to sit against. Without a placket the zip tape shows and the closure looks unfinished.
We also reinforce the top of the zip with a small bar tack and a hook and eye, because the top of a centre-back zip takes the most strain when the gown is pulled on, and that is the point where a cheap closure fails first. The hook and eye is hand-sewn so it sits flush and does not catch the hair. On a gown with a low back we move the zip stop lower and add a modesty panel, because a low-back gown with a visible closure is a design error no trim can save.
The mistake made here is a zip that is a few millimetres too long or too short for the opening. If the zip is longer than the back seam, the excess rides up inside the gown and the centre back puckers. If it is short, the top of the closure gapes and the wearer cannot close the gown without help. Both faults are invisible on the flat and obvious on the body.
Its invisible cost is a garment that will not close. A gown that will not zip is a gown that is returned the day after it is worn, and the cost is not only the refund. It is the lost event, the lost review, and the buyer who does not reorder. We measure the zip opening from the approved toile and we cut the zip to match, and we run a zip pull test on the pre-production sample so the slider does not stall halfway.
Station 7. Hand embellishment
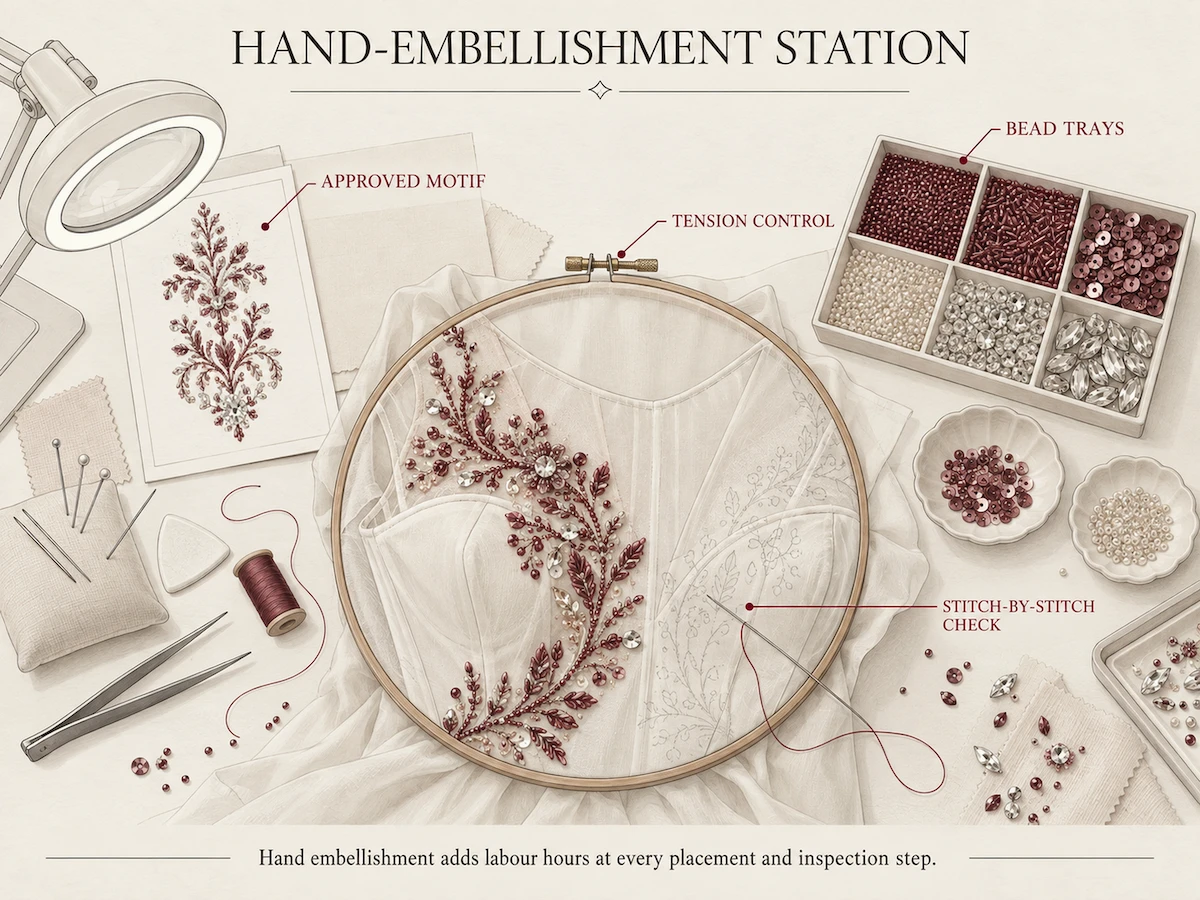
This is the station that defines an occasion gown and the one that explains most of its cost. Embellishment is the sequins, the beads, the crystals, the hand-applied motifs placed one at a time against a placement map. On a heavily beaded gown a single operator spends four and a half hours on one piece. There is no machine that places beadwork to the same standard on a shaped, curved panel, and the people who do this are among the most skilled in the building.
We work from a placement map, a printed overlay that shows exactly where each element goes, so that piece 1 and piece 400 match. The base cloth for embellishment is usually a mesh or a light crepe, and we stabilise it on a frame so the tension is even and the beads do not drag the cloth out of shape. Thread colour, bead size and density are all specified in the tech pack, and we keep a sealed sample of the approved density so bulk can be checked against it.
Embellishment is also where we see the clearest gap between a quoted price and a real one. A gown quoted suspiciously low for its bead density is, in our experience, one of three things. The work is machine-applied and the garment is honestly different. The density is a fraction of what the sketch implied. Or the quote is not real and the number moves at confirmation. We tell you which you are getting before you commit.
The mistake made here is a placement map that drifts. If the map is not pinned securely the embellisher follows a shifted guide, and half a gown is beaded a centimetre off the line of the other half. The error is invisible until the gown is laid flat and the two sides do not mirror.
Its invisible cost is the hours. A gown beaded wrong is not fixed. It is stripped and redone, and stripping beadwork without damaging the mesh can take longer than applying it. We lock the map, we check the first finished panel against the sealed sample before the embellisher continues, and we count the density on a measured square so the cost you were quoted is the cost you receive. Buyers who want to see the range of constructions and what each one costs should read our Three Dresses, Costed: What a Factory Actually Charges For, and buyers deciding between machine and hand finishes should read our note on Pleats and Draping: How They're Engineered.
Station 8. Steam pressing and hanging
A gown is shaped as much by pressing as by sewing. We steam press on a form rather than a flat board so the garment is pressed into its worn shape, not ironed flat and then expected to recover. Seams are opened, the bodice is shaped over a ham, the skirt is steamed to fall, and any shine from the iron is avoided by pressing through a cloth. Steam pressing also relaxes the cloth after construction, which is when small puckers that were hidden in the seams finally show and get caught.
We also bag each gown in a protective cover at this stage so the embellishment does not snag in transit, and we never fold a structured bodice, because a folded boned bodice creases along the bone and the crease reads as a fault even when the gown is perfect.
The mistake made here is pressing too hot on a synthetic or a beaded base. Heat melts fibre and loosens adhesive, and a gown pressed too hot carries a scorch or a flattening that cannot be reversed. We set the iron by fabric type and we test on a scrap first.
Its invisible cost is the finish. A gown that is poorly pressed looks worn before it is sold, and pressing is the last thing a buyer inspects and the first thing a customer notices. After pressing we hang the gown on a padded hanger with the skirt supported, not clamped at the waist, because a clamped waist leaves a crease that no event-night steaming removes. We hang gowns for a minimum period before packing so any residual wrinkle from handling drops out on its own.
Station 9. Final inspection
The gown is inspected before it is packed, not after. We check it on a form under even light, measuring against the approved sample and the tech pack line by line. Construction, symmetry, closure function, embellishment density, stain and loose thread, and the hang of the skirt. We run the zip open and closed, we check the hook and eye, and we confirm the labelling and the care label are correct for your market.
Our production facilities in Guangzhou and Dongguan are ISO 9001 certified for quality management, OEKO-TEX STANDARD 100 compliant for tested materials, amfori BSCI-audited for social compliance, and SGS-inspected at finished-goods stage. Those marks matter less as logos and more as the reason a fault is caught at station nine rather than at your warehouse.
We also weight-check and carton-check at this station, because a gown that passes inspection and then ships in a carton with the wrong piece count is a different kind of failure, the kind that shows up as a short delivery and a reconciled invoice. The inspection sign-off is the last signature before the gown leaves the building, and we treat it as the moment the order becomes your inventory rather than our work.
The mistake made here is inspecting against memory instead of against the sealed sample. When the inspector works from what the gown ought to look like rather than the approved reference, a small deviation in embellishment density or hem length slips through and becomes your problem at the photo shoot.
Its invisible cost is the shipment you cannot trust. A missed fault in a run of two hundred is two hundred problems, and the cost of finding them is your own returns process, which is slower and more expensive than our bench check. We inspect to the sealed sample and we photograph the result, so the gown you open is the gown we approved.
How the time splits, station by station
The table below is the route of a typical beaded evening gown, with the time each station adds per finished piece. The embellishment station dominates the clock, which is why a beaded gown and a plain one of the same silhouette are not close in price. Times marked TBC are illustrative of a standard beaded build and should be confirmed against our production records before publishing.
| Station | What happens there | Typical time per gown (TBC) |
|---|---|---|
| 1. Pattern and marker | Draft, grade, plot marker | 5 min allocated per piece (TBC) |
| 2. Toile and fitting | Sample-stage proof, amortised in bulk | sample only, not per bulk piece (TBC) |
| 3. Fabric cutting and numbering | Lay, cut, bundle, number | 12 min (TBC) |
| 4. Gathering, piping, stay tape | Ease, edge definition, shape hold | 25 min (TBC) |
| 5. Bodice structure | Cups, rigilene boning, padding, casing | 40 min (TBC) |
| 6. Concealed zip and placket | Invisible zip, hook and eye, modesty | 15 min (TBC) |
| 7. Hand embellishment | Bead and sequin placement to map | 270 min, about 4.5 hours (TBC) |
| 8. Steam pressing and hanging | Form press, bag, hang to settle | 10 min (TBC) |
| 9. Final inspection | Measure, function-check, carton-check | 12 min (TBC) |
The timeline you plan against
Sampling runs seven to ten days from an approved brief to a posted toile and a pre-production sample. That window assumes the tech pack is complete and the fabric is on hand or specified. A brief that arrives without measurements or with an undecided fabric spends its first days in questions, not in the workshop, and the clock does not start until the unknowns are closed.
Bulk production runs twenty to twenty-five days in peak season and fifteen to twenty days off season. Peak is roughly the months before the major occasion periods, when every factory in Guangzhou and Dongguan is full and your order queues behind others. Off season is the quieter stretch where a slot opens faster and the same gown turns around in less time. Neither number includes freight or the customs clock at your end.
| Stage | Window | Basis |
|---|---|---|
| Sampling | 7 to 10 days | Approved brief to posted PP sample |
| Bulk, peak season | 20 to 25 days | Shared capacity before occasion periods |
| Bulk, off season | 15 to 20 days | Open slots, shorter queue |
We quote within twenty-four hours when the brief is complete. A complete brief is the tech pack or reference images, the target fabric or at least its weight and fibre, your size block and market, your quantity, your target price, and your delivery window. Six inputs, and the difference between a same-day number and three days of email is whether those six are present.
The 260 ready-stock styles on our ready-stock hub skip this timeline entirely. Those are made, priced in RMB, and on the shelf, for buyers who need product without a development cycle. Everything above describes the made-to-order route, which is the longer path and the one that produces a gown built to your specification rather than to a catalogue.
Related reading
- Three Dresses, Costed: What a Factory Actually Charges For
- What affects clothing manufacturing costs
- Pleats and Draping: How They're Engineered
Send us a tech pack or reference images and the six inputs above, and you will get a quoted route through these nine stations within twenty-four hours. Start your brief at /request-a-quote/.